How Can We Help?
Landscape Spline Import Options
NOTE
To use the Import Lines as Landscape Splines feature, you must first select a landscape to import the vector lines to – the Import Lines as Landscape Splines button will be inactive (greyed out) until you select a landscape actor.
The Vector Line Import Options window gives you the opportunity to set the parameters for all landscape splines to be created from your GIS vector data. Once imported, you can modify these values for individual control points, segments, or splines by using the landscape Edit Spline tools built in to Unreal Editor.
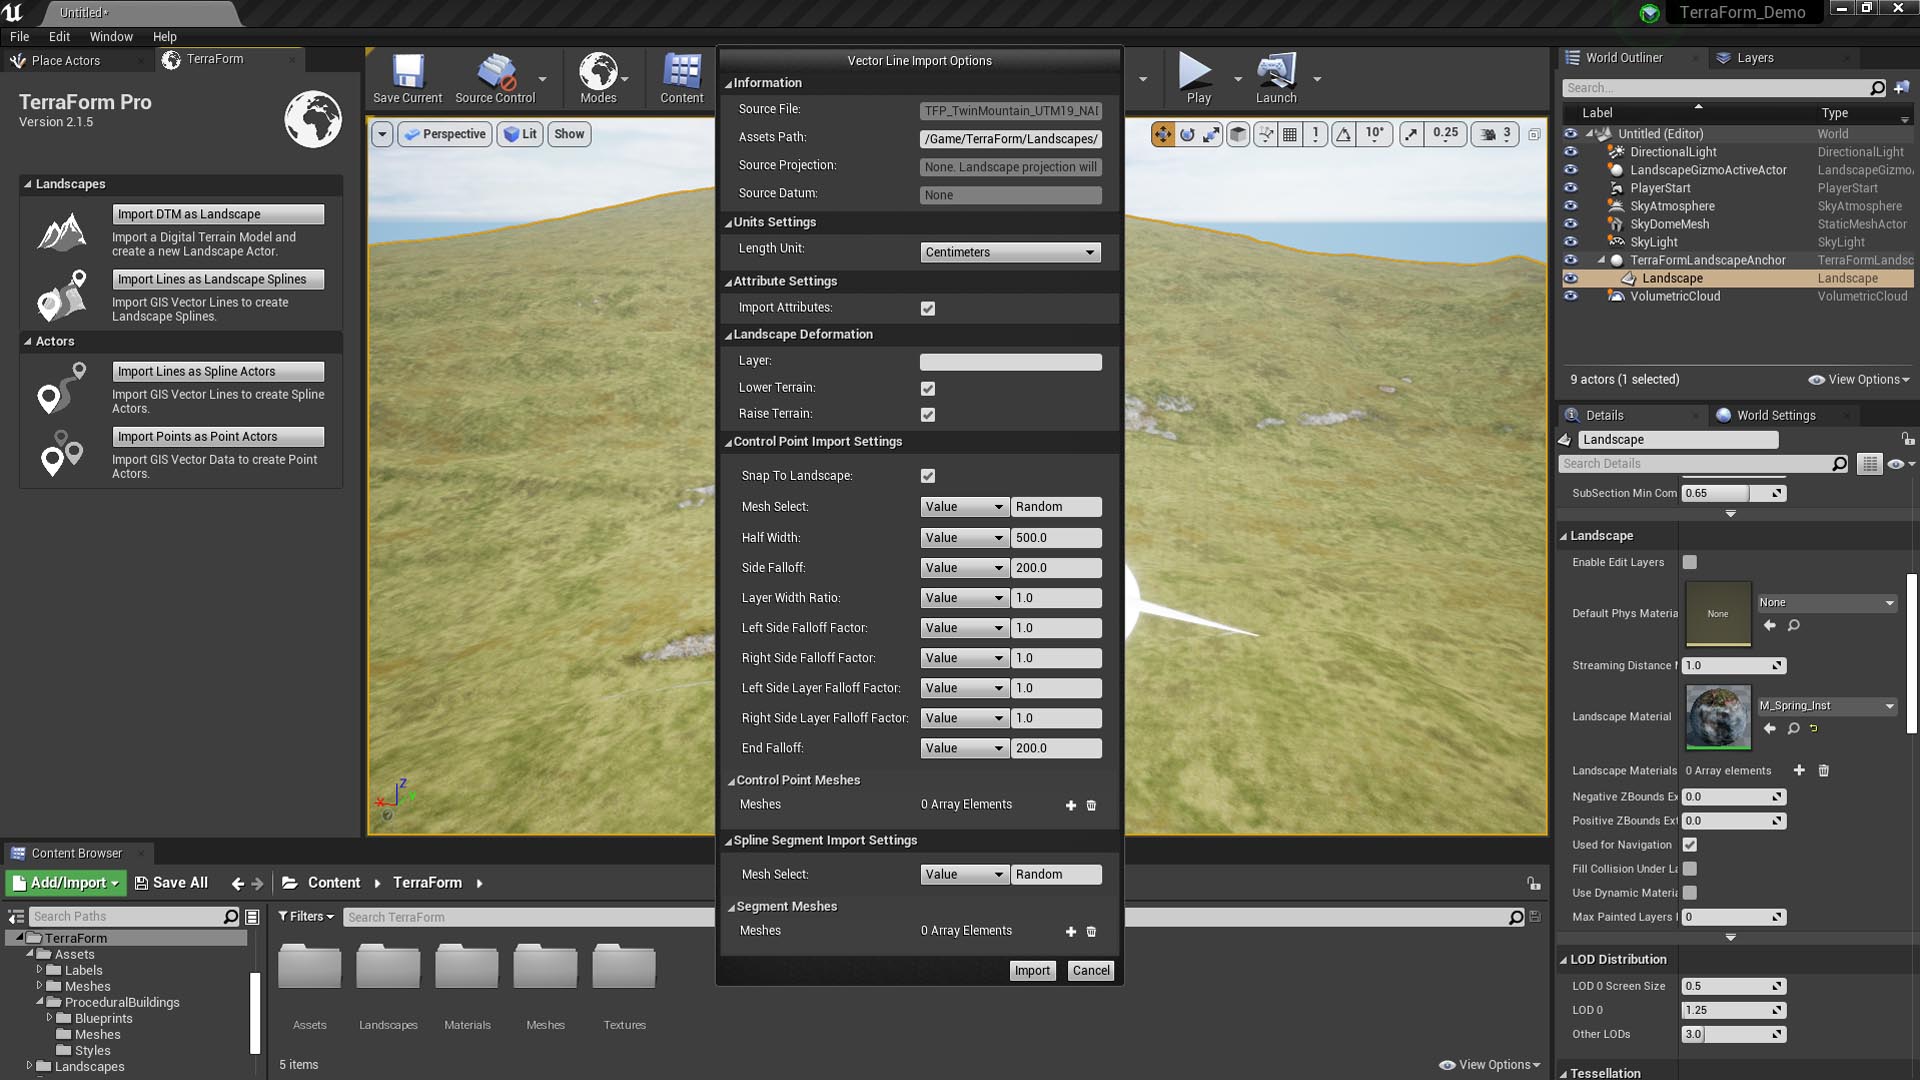
The Vector Line Import Options window appears when you click the Import Lines as Landscape Splines button (available when you’ve selected a landscape actor) and looks like this:
Information
Source File: The name of the GIS vector line (.shp) file you’re importing.
Assets Path: The path to the folder to use to save any assets created during the import process.
Source Projection: The projection your source data is in. TerraForm may occasionally list this as ‘none’, but this should not affect the import process.
Source Datum: The datum used by your source data. TerraForm may occasionally list this as ‘none’, but this should not affect the import process.
Unit Settings
Length Unit: This sets the length units to use for the values specified in the Control Point Import Settings (half-width, falloff values etc…).
Attribute Settings
Import Attributes: Whether or not to import any attributes your vector data may include. When checked, further options will appear in the Control Point Import and Spline Segment Import Settings sections below.
Landscape Deformation
Layer: This is the layer of the landscape layer blend material applied to your landscape that TerraForm should use under the landscape spline you’re creating. Make sure to spell it correctly.
Lower Terrain: This setting affects how the terrain of your landscape will be deformed to blend with the landscape spline. When checked, terrain values above your spline will be lowered to blend the landscape with your landscape spline.
Lower Terrain: As above. When checked, terrain values below your spline will be raised to blend the landscape with your landscape spline.
Control Point Import Settings
Snap To Landscape: When checked, TerraForm will clamp each of the control points of the landscape spline to the elevation of the landscape. When unchecked, TerraForm will use the z-value of the imported GIS vector lines to set the altitude of each control point.
Mesh Select: This is the method used to select a mesh from the array of available Control Point Meshes (below) to be placed at each control point. By default this value is set to Random. If only a single mesh is added to the array, this will be used at every control point. If multiple meshes are added, they will be selected at random. You can also specify a mesh by typing in its name, as defined in the array. If an attribute title is set in Mesh Select, the attribute value will be used to specify the mesh from the array to use at a control point.
Half Width: Half the width of the landscape spline to be created as measured from its centre line (i.e. if the Length Unit is Centimeters, and the Half Width is set to 500.0, the landscape spline’s width will be 1000.0cm.
Side Falloff: The lateral distance at each control point over which the spline will be blended with the landscape’s terrain. If a ‘Layer’ is specified, the landscape materials will also be blended over this distance.
Layer Width Ratio: This is effectively a multiplier of the Side Falloff value for the layer material that will be used under the spline. By default this is set to 1.0, meaning that if the Side Falloff value is set to 200.0, the layer under the landscape spline will be blended with the landscape layer blend material over a distance of 200.0. If set to 1.5, the blend distance of the materials will be 300.0. If 0.5, 100.0, and so on.
Left Side Falloff Factor: The Side Falloff Factor is a multiplier for the Side Falloff value that applies to the terrain blending between the landscape and the landscape spline. If you set the Side Falloff value to 200.0 and the Left Side Falloff Factor to 5.0, the landscape’s terrain will be blended with the landscape spline over a distance of 1000.0 to the left of the spline.
Right Side Falloff Factor: As Left Side Falloff Factor, but on the right.
Left Side Layer Falloff Factor: This setting does the equivalent of Left Side Falloff Factor, but on the landscape layer blending (materials), rather than the terrain.
Right Side Layer Falloff Factor: As Left Side Layer Falloff Factor, but on the right.
End Falloff: The distance over which to blend the landscape to meet the end of the landscape spline.
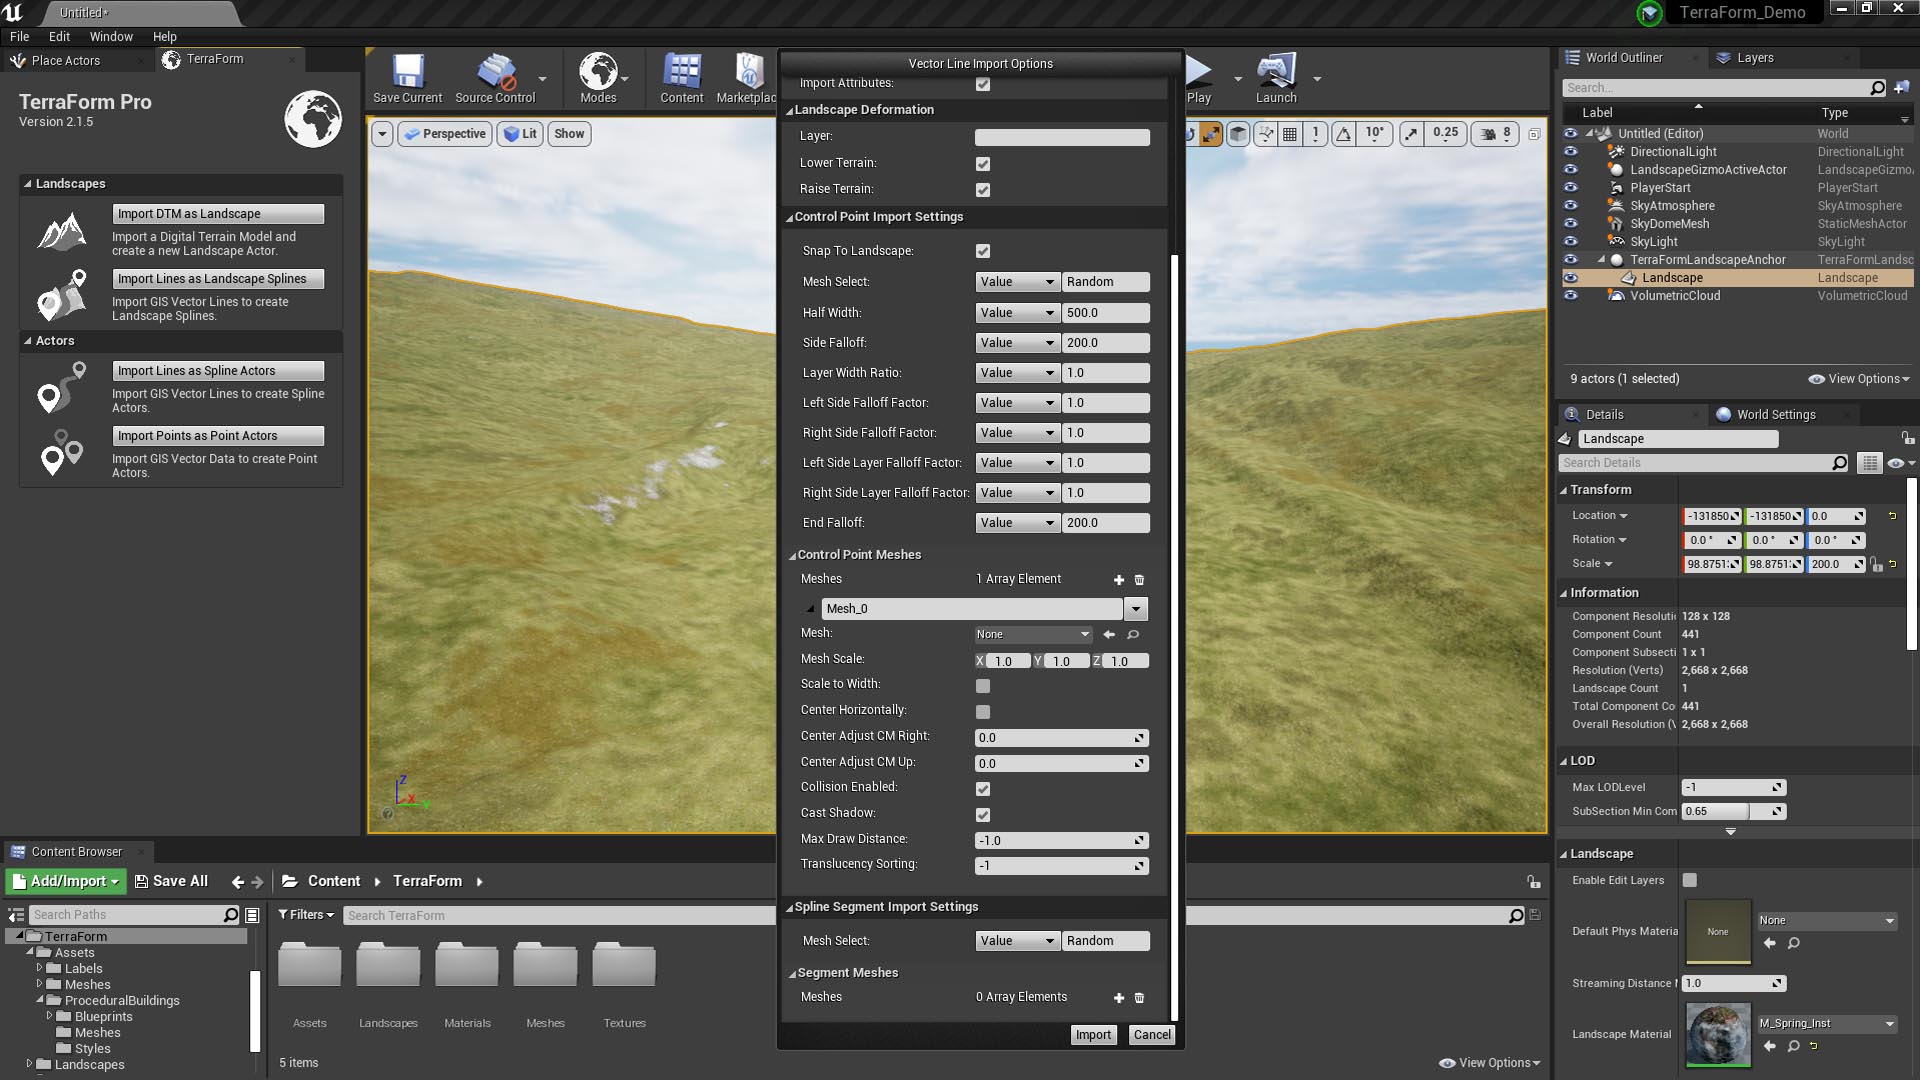
Control Point Mesh
Once you’ve added an element to the control point mesh array, the following options appear:
Array Elements: The number of static meshes in the array available to Control Points. + to add. Bin button to empty.
Mesh Name: By default this appears as Mesh_x, where x is an integer incremented from 0. If using attributes to select meshes at control points, type the attribute value that refers to each mesh here.
Mesh: The mesh object to place at each control point.
Mesh Scale: The scale of the static mesh object being placed at each control point.
Collision Enabled: Whether you should be able to bump into meshes at control points.
Cast Shadow: Whether control point meshes should cast a shadow.
Max Draw Distance: The maximum distance that the control point mesh should be drawn.
Translucency Sort Priority: The sort priority of transparencies in the control point mesh.
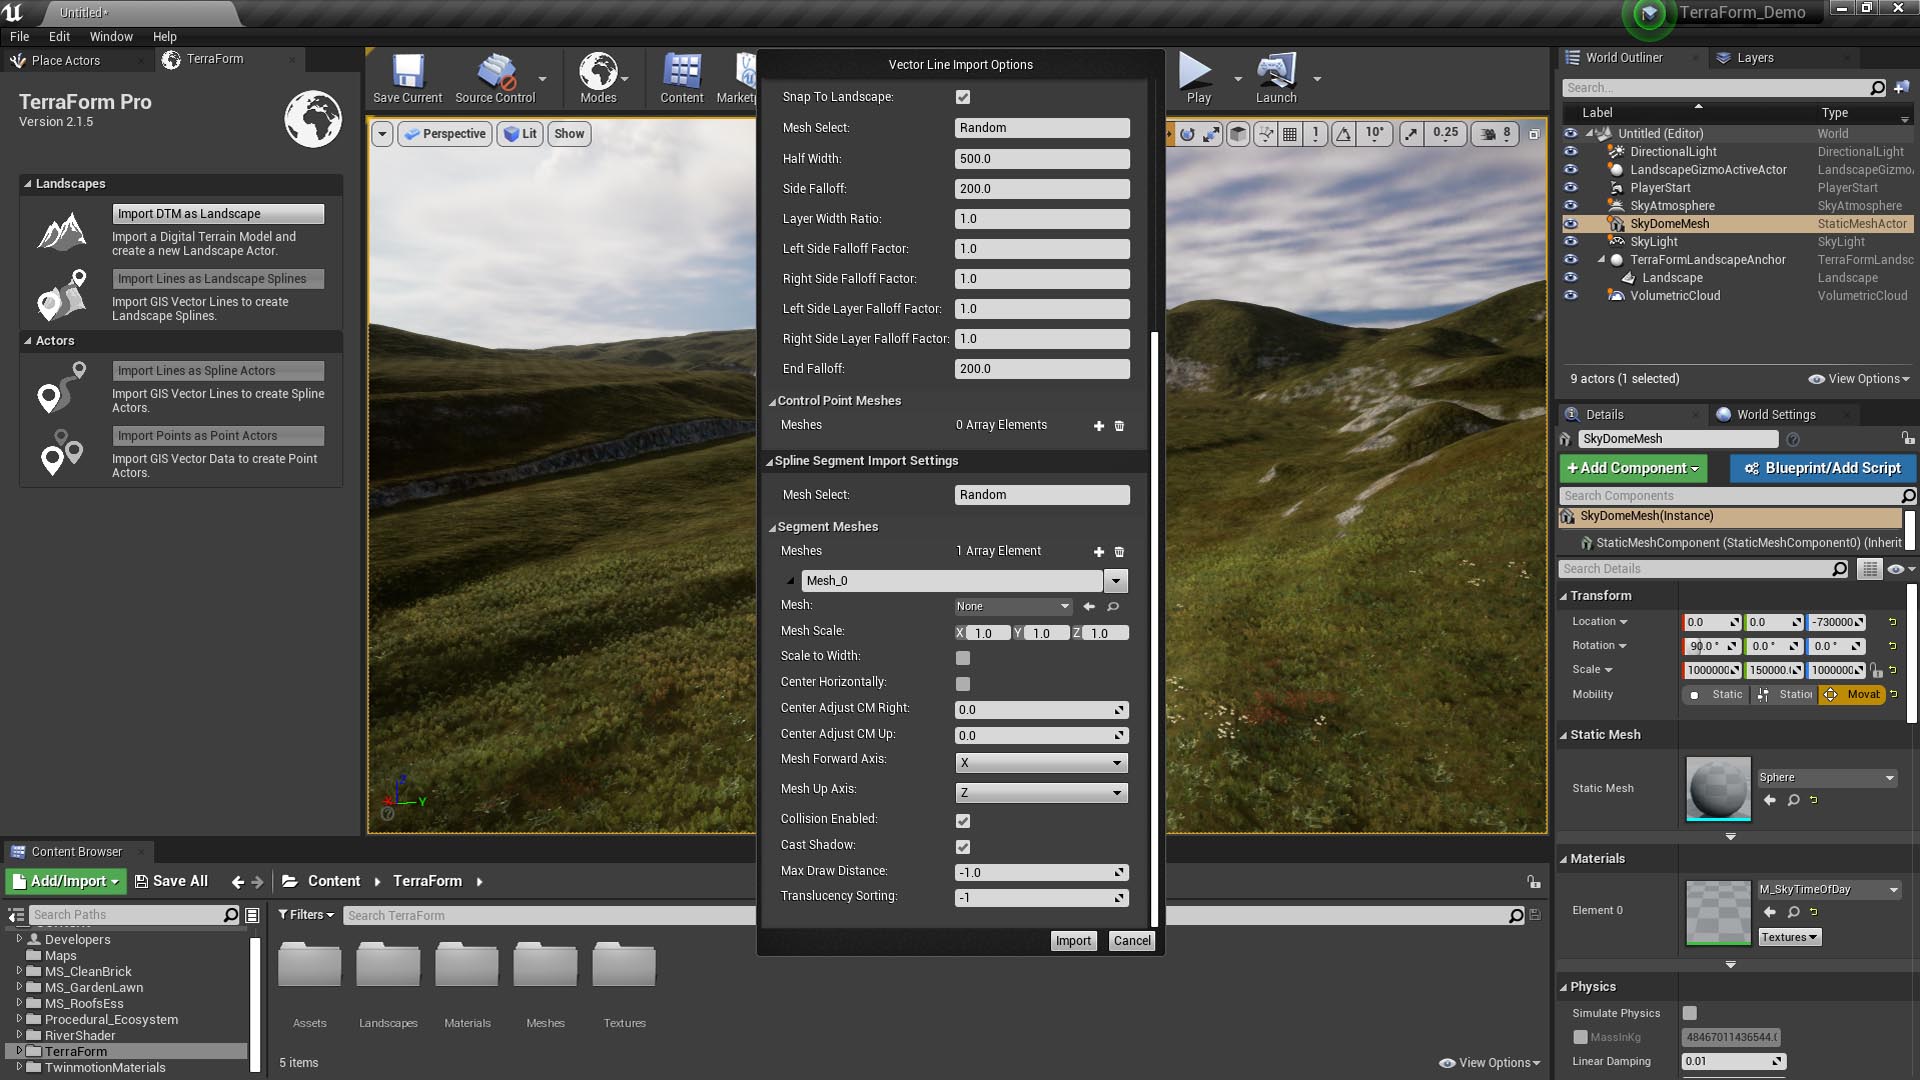
Spline Segment Import Settings
Segment Mesh
Once you’ve added an element to the segment mesh array, the following mesh options appear:
Mesh Name: By default this appears as Mesh_x, where x is an integer incremented from 0. If using attributes to select meshes at control points, type the attribute value that refers to each mesh here.
Mesh: The static mesh object to use for landscape spline segments.
Scale: The scale of the mesh.Scale to Width: Whether the mesh should be scaled to the width of the spline at the control point.
Center Horizontally: Whether the mesh should be centered horizontally to the landscape spline.
Center Adjust CM Right: The amount (in cm) to offset the segment mesh to the right of the spline centreline (in cm). Use negative values to offset the meshes to the left.
Center Adjust CM Up: The amount (in cm) to offset the segment mesh upwards. Use negative values to offset the meshes below the centreline.
Mesh Forward Axis: The mesh object axis to use in the direction of the spline.
Mesh Scale: The scale of the segment mesh object.
Mesh Vertical Offset: The distance above or below the spline to place the segment mesh.
Collision Enabled: Whether you should be able to bump into segment meshes.
Cast Shadow: Whether segment meshes should cast a shadow.
Max Draw Distance: The maximum draw distance of your spline segment meshes.
Translucency Sort Priority: The sort priority of transparencies in the spline segment mesh.


